
💙
Simple & Stress-Free for Your Animal
The sampling process is quick, gentle, and completely painless.
It only takes a few minutes and does not cause any discomfort to your dog, cat, or horse.
Just follow the step-by-step instructions below.
Kon pa Kolektá e Muestra di DNA di Bo Kachó
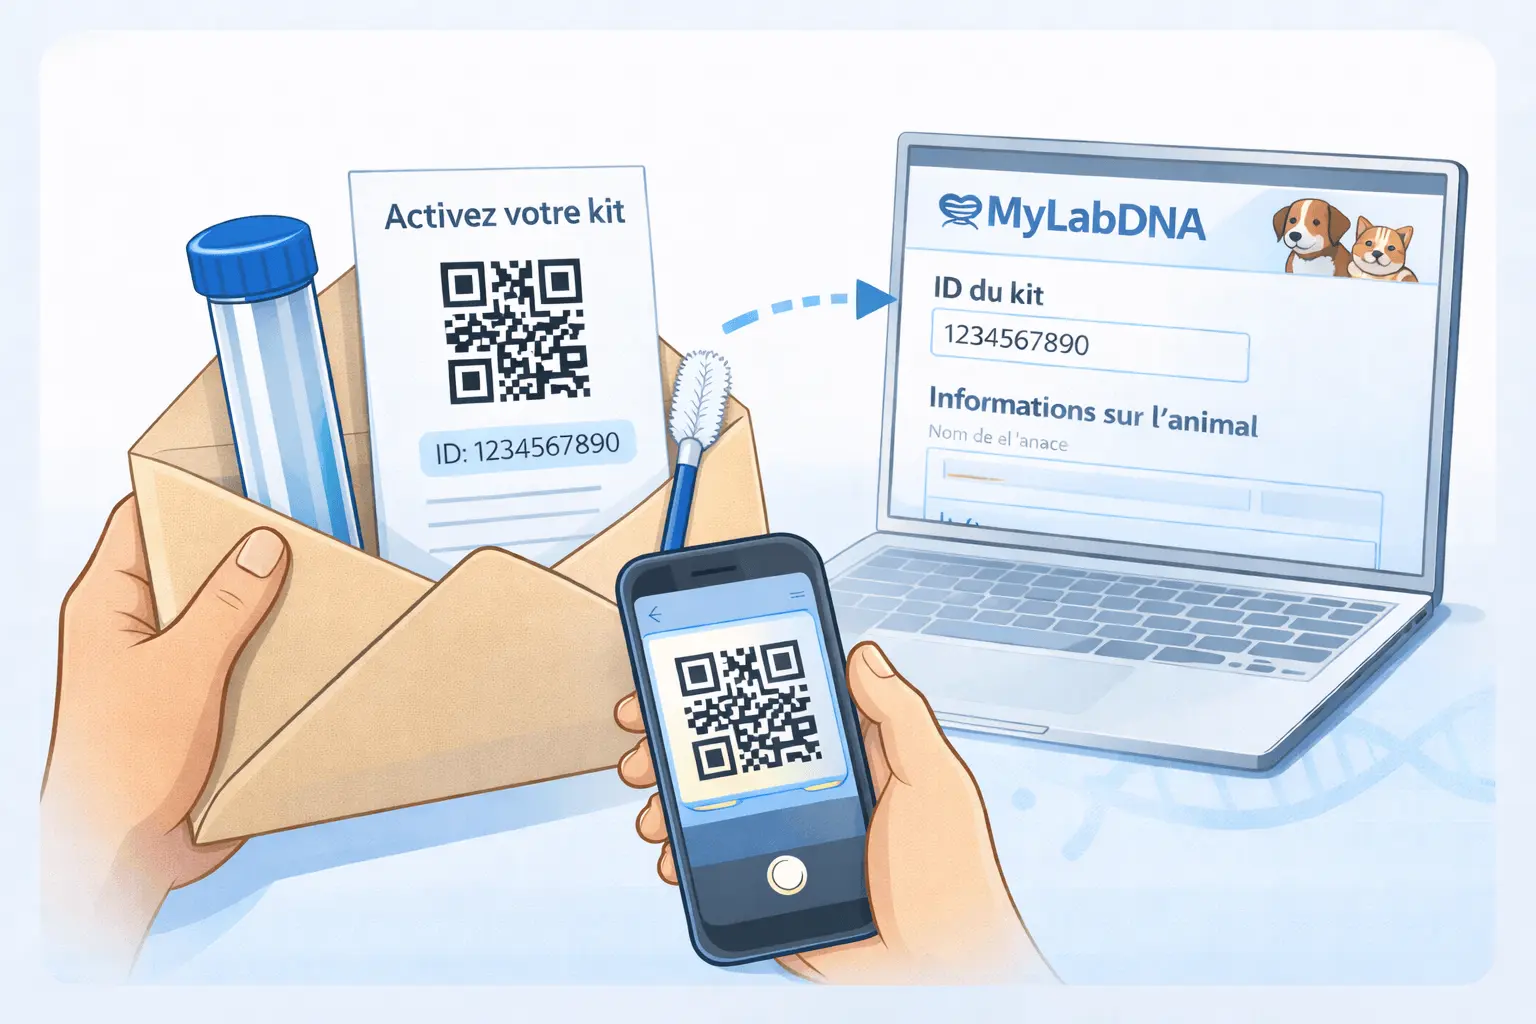
Step 1
Bon notisia!
Bo kit di muestra na kas a yega.
Pa kuminsá, simplemente skan e kódigo QR òf bishitá e link ku ta wòrdu duná pa aktivá bo kit i registrá e informashon di bo bestia.
Bon notisia!
Bo kit di muestra na kas a yega.
Pa kuminsá, simplemente skan e kódigo QR òf bishitá e link ku ta wòrdu duná pa aktivá bo kit i registrá e informashon di bo bestia.
Step 2
Pa kuminsá sin problema, por fabor tuma e sitobrush i e tubo ku ta kontené e solushon di konservativo.
Pa kuminsá sin problema, por fabor tuma e sitobrush i e tubo ku ta kontené e solushon di konservativo.
Step 3
Kuminsá dor di hinka suavemente e punta di e sitobrush den boka di bo kachó, poniendo esaki suavemente kontra e parti paden di e kara.
Move pokopoko i trankil pa sigurá ku bo kachó ta keda kómodo durante e proseso di tumamentu di muestra.
Kuminsá dor di hinka suavemente e punta di e sitobrush den boka di bo kachó, poniendo esaki suavemente kontra e parti paden di e kara.
Move pokopoko i trankil pa sigurá ku bo kachó ta keda kómodo durante e proseso di tumamentu di muestra.
Step 4
Frega e sitobrush suavemente kontra e parti paden di bo kachó su kara, rotando esaki pa mas o ménos 20 sekònde.
Si ta nesesario, bo por usa bo otro man pa tene e kara suavemente kontra e sitobrush pa garantisá bon kontakto i un kolekshon di muestra efektivo.
Frega e sitobrush suavemente kontra e parti paden di bo kachó su kara, rotando esaki pa mas o ménos 20 sekònde.
Si ta nesesario, bo por usa bo otro man pa tene e kara suavemente kontra e sitobrush pa garantisá bon kontakto i un kolekshon di muestra efektivo.
Step 5
Por fabor, hasi sigur di no frega e sitobrush kontra e lenga di bo kachó i pa evitá di rekohé saliva mas tantu posibel.
The cells containing the DNA required for analysis are located on the inside of the cheek, not on the tongue.
Kontakto korekto ku e kara ta esensial pues pa optené un muestra di kalidat haltu.
Step 6
Unabes ku e muestra a wòrdu rekohé, kita e sitobrush suavemente for di boka di bo kachó.
Then cut the handle about one centimeter below the brush tip and place the brush head into the tube containing the preservative solution.
Unabes ku e muestra a wòrdu rekohé, kita e sitobrush suavemente for di boka di bo kachó.
Then cut the handle about one centimeter below the brush tip and place the brush head into the tube containing the preservative solution.
Step 7
Sera e tubo kuidadosamente dor di schroef e tapa bon pa garantisá un seyo sigur.
Sòru pa e ta bon será pa evitá kualke lekmentu di e solushon di konservativo.
Sera e tubo kuidadosamente dor di schroef e tapa bon pa garantisá un seyo sigur.
Sòru pa e ta bon será pa evitá kualke lekmentu di e solushon di konservativo.
Step 8
Did you order the Dog Complete DNA Test?
If your kit includes the Dog Complete DNA Test, please proceed with steps 9, 10, and 11.
If not, you may skip directly to step 12.
How can you identify the Dog Complete DNA Test?
You will notice that your kit contains an additional pink swab.
Did you order the Dog Complete DNA Test?
If your kit includes the Dog Complete DNA Test, please proceed with steps 9, 10, and 11.
If not, you may skip directly to step 12.
How can you identify the Dog Complete DNA Test?
You will notice that your kit contains an additional pink swab.
Step 9 (Optional with the Complete Test)
Begin by gently inserting the tip of the swab into your dog’s mouth, placing it softly against the inside of the cheek.
Move pokopoko i trankil pa sigurá ku bo kachó ta keda kómodo durante e proseso di tumamentu di muestra.
Begin by gently inserting the tip of the swab into your dog’s mouth, placing it softly against the inside of the cheek.
Move pokopoko i trankil pa sigurá ku bo kachó ta keda kómodo durante e proseso di tumamentu di muestra.
Step 10 (Optional with the Complete Test)
Gently rub the swab against the inside of your dog’s cheek, rotating it for about 20 sekònde.
If needed, you may use your other hand to softly hold the swab against the cytobrush to ensure good contact and an effective sample collection.
Gently rub the swab against the inside of your dog’s cheek, rotating it for about 20 sekònde.
If needed, you may use your other hand to softly hold the swab against the cytobrush to ensure good contact and an effective sample collection.
Step 11 (Optional with the Complete Test)
Important
After collecting the sample, return the swab directly to its original blister packaging.
Do not insert the swab into the tube containing liquid, as this tube has already been used.
Important
After collecting the sample, return the swab directly to its original blister packaging.
Do not insert the swab into the tube containing liquid, as this tube has already been used.
Step 12
Place the tube containing the cytobrush — and, if applicable, the pink swab for the Complete test — together with the sampling certificate into a padded or cardboard envelope to protect them during shipping.
Then send everything to the laboratory at MyLabDNA
2893 estaing
42140 Virigneux
France.
Place the tube containing the cytobrush — and, if applicable, the pink swab for the Complete test — together with the sampling certificate into a padded or cardboard envelope to protect them during shipping.
Then send everything to the laboratory at MyLabDNA
2893 estaing
42140 Virigneux
France.
How to Collect Your Cat’s DNA Sample

Step 1
Bon notisia!
Bo kit di muestra na kas a yega.
Pa kuminsá, simplemente skan e kódigo QR òf bishitá e link ku ta wòrdu duná pa aktivá bo kit i registrá e informashon di bo bestia.
Bon notisia!
Bo kit di muestra na kas a yega.
Pa kuminsá, simplemente skan e kódigo QR òf bishitá e link ku ta wòrdu duná pa aktivá bo kit i registrá e informashon di bo bestia.
Step 2
Pa kuminsá sin problema, por fabor tuma e sitobrush i e tubo ku ta kontené e solushon di konservativo.
Pa kuminsá sin problema, por fabor tuma e sitobrush i e tubo ku ta kontené e solushon di konservativo.
Step 3
Begin by gently inserting the tip of the cytobrush into your cat’s mouth, placing it softly against the inside of the cheek.
Move slowly and calmly to ensure your cat remains comfortable during the sampling process.
Begin by gently inserting the tip of the cytobrush into your cat’s mouth, placing it softly against the inside of the cheek.
Move slowly and calmly to ensure your cat remains comfortable during the sampling process.
Step 4
Gently rub the cytobrush against the inside of your cat’s cheek, rotating it for about 20 sekònde.
Si ta nesesario, bo por usa bo otro man pa tene e kara suavemente kontra e sitobrush pa garantisá bon kontakto i un kolekshon di muestra efektivo.
Gently rub the cytobrush against the inside of your cat’s cheek, rotating it for about 20 sekònde.
Si ta nesesario, bo por usa bo otro man pa tene e kara suavemente kontra e sitobrush pa garantisá bon kontakto i un kolekshon di muestra efektivo.
Step 5
Please make sure not to rub the cytobrush against your cat’s tongue and to avoid collecting saliva as much as possible.
The cells containing the DNA required for analysis are located on the inside of the cheek, not on the tongue.
Kontakto korekto ku e kara ta esensial pues pa optené un muestra di kalidat haltu.
Step 6
Once the sample has been collected, gently remove the cytobrush from your cat’s mouth.
Then cut the handle about one centimeter below the brush tip and place the brush head into the tube containing the preservative solution.
Once the sample has been collected, gently remove the cytobrush from your cat’s mouth.
Then cut the handle about one centimeter below the brush tip and place the brush head into the tube containing the preservative solution.
Step 7
Sera e tubo kuidadosamente dor di schroef e tapa bon pa garantisá un seyo sigur.
Sòru pa e ta bon será pa evitá kualke lekmentu di e solushon di konservativo.
Sera e tubo kuidadosamente dor di schroef e tapa bon pa garantisá un seyo sigur.
Sòru pa e ta bon será pa evitá kualke lekmentu di e solushon di konservativo.
Step 8
Did you order the cat Complete DNA Test?
If your kit includes the cat Complete DNA Test, please proceed with steps 9, 10, and 11.
If not, you may skip directly to step 12.
How can you identify the cat Complete DNA Test?
You will notice that your kit contains an additional pink swab.
Did you order the cat Complete DNA Test?
If your kit includes the cat Complete DNA Test, please proceed with steps 9, 10, and 11.
If not, you may skip directly to step 12.
How can you identify the cat Complete DNA Test?
You will notice that your kit contains an additional pink swab.
Step 9 (Optional with the Complete Test)
Begin by gently inserting the tip of the swab into your cat’s mouth, placing it softly against the inside of the cheek.
Move slowly and calmly to ensure your cat remains comfortable during the sampling process.
Begin by gently inserting the tip of the swab into your cat’s mouth, placing it softly against the inside of the cheek.
Move slowly and calmly to ensure your cat remains comfortable during the sampling process.
Step 10 (Optional with the Complete Test)
Gently rub the swab against the inside of your cat’s cheek, rotating it for about 20 sekònde.
If needed, you may use your other hand to softly hold the swab against the cytobrush to ensure good contact and an effective sample collection.
Gently rub the swab against the inside of your cat’s cheek, rotating it for about 20 sekònde.
If needed, you may use your other hand to softly hold the swab against the cytobrush to ensure good contact and an effective sample collection.
Step 11 (Optional with the Complete Test)
Important
After collecting the sample, return the swab directly to its original blister packaging.
Do not insert the swab into the tube containing liquid, as this tube has already been used.
Important
After collecting the sample, return the swab directly to its original blister packaging.
Do not insert the swab into the tube containing liquid, as this tube has already been used.
Step 12
Place the tube containing the cytobrush (and optionally the pink swab for the Complete test) along with the sampling certificate into a padded or cardboard envelope to protect them during shipping.
Then send everything to the laboratory at MyLabDNA
2893 estaing
42140 Virigneux
France.
Place the tube containing the cytobrush (and optionally the pink swab for the Complete test) along with the sampling certificate into a padded or cardboard envelope to protect them during shipping.
Then send everything to the laboratory at MyLabDNA
2893 estaing
42140 Virigneux
France.
How to Collect Your Horse’s DNA Sample

Step 1
Bon notisia!
Your kit has been successfully activated and your animal’s information has been registered.
Your sampling kit is provided on the first page of this document.
Bon notisia!
Your kit has been successfully activated and your animal’s information has been registered.
Your sampling kit is provided on the first page of this document.
Step 2
To get started, locate the section where the horse’s mane hairs will need to be attached with adhesive tape.
To get started, locate the section where the horse’s mane hairs will need to be attached with adhesive tape.
Step 3
Approach the horse’s mane calmly and select one or two hairs at the base. Pull them out in one quick backward motion.
Repeat the process until you have collected 20 to 30 mane hairs.
Approach the horse’s mane calmly and select one or two hairs at the base. Pull them out in one quick backward motion.
Repeat the process until you have collected 20 to 30 mane hairs.
Step 4
Ensure that the roots are clearly visible at the end of each mane hair.
Ensure that the roots are clearly visible at the end of each mane hair.
Step 5
Carefully inspect each mane hair.
If the root bulb is not present at the end, discard the hair and do not include it in the sampling kit.
Carefully inspect each mane hair.
If the root bulb is not present at the end, discard the hair and do not include it in the sampling kit.
Step 6
Place all mane hairs with intact root bulbs onto the designated area of the kit and secure them using adhesive tape.
Ensure that all the root bulbs are positioned on the same side of the kit.
Place all mane hairs with intact root bulbs onto the designated area of the kit and secure them using adhesive tape.
Ensure that all the root bulbs are positioned on the same side of the kit.
Step 7
Place the kit containing the hair manes along with the sampling certificate into a padded or cardboard envelope to protect them during shipping.
Then send everything to the laboratory at MyLabDNA
2893 estaing
42140 Virigneux
France.
Place the kit containing the hair manes along with the sampling certificate into a padded or cardboard envelope to protect them during shipping.
Then send everything to the laboratory at MyLabDNA
2893 estaing
42140 Virigneux
France.
📦 Next step
Once your sample is collected, continue with the next steps:
🧬 Choose a DNA test
Explore the right DNA test for your animal: